

How To Make Faster Internet For Free On Windows 10(DNS settings)
Intro win+DNS Settings↓when you sign up to get internet access with an internet service provider there are various network settings supplied to you including the domain name system addresses instead of relying on the default DNS server of your ISP which can be slower less private and in some cases less reliable changing to a free public DNS server is a great way to improve your internet speed and overall experience on Windows 10 in short without going into a full explanation of DNS.It's best to think of DNS as a translation service for example in the address bar when you want to go to a website instead of typing in the IP address for every website that you visit the DNS lets you type in a user-friendly domain name that gets translated into the actual IP address making it easier to connect with that side. In this article I gave several tips to increase the internet speed including DNS in article I'll attempt to take a deeper dive and give additional details to help you choose the best DNS server and settings for your computer.

let's now go through the steps to change the DNS settings first I'll go through the steps using the Settings app which is now the easiest way to do this on Windows 10 and afterwards for those of you that prefer the old-school methods or have another computer lying around with Windows XP or 7.
I'll show you the steps using the control panel for those of you that are new to Windows 10 to open
the Settings app left click the Windows Start menu icon in the lower left then click on settings go to

network and Internet in the left panel based on your connection select either Wi-Fi or Ethernet for this

computer that would be Ethernet select the connected network scroll down to the IP settings section and click on edit in the drop down menu select manual toggle to switch on for ipv4 leave the top


Let's take a quick look at the best DNS services Google Public DNS is perhaps the most well known and one of the fastest with data centers worldwide.But its privacy policy doesn't meet the higher standards of some of its competitors

CloudFlare has a public dns with impressive speeds and an excellent privacy policy that will never log your IP address sell your data and all debug logs are removed from their system within 24 hours.Open DNS which is now owned by Cisco is also very popular with more than 90 million users it offers fast speeds phishing sites are blocked by default and they claim to have 100% reliability and uptime there are other DNS servers out there to choose from than those mentioned.I'd recommend choosing one of these three when you get started what works best for me may not work best for you there are numerous variables including distance from the DNS server that can impact performance so use one of these for a few days if you don't see any noticeable improvement.Try out another one my personal favorite is cloud flare so for preferred DNS.
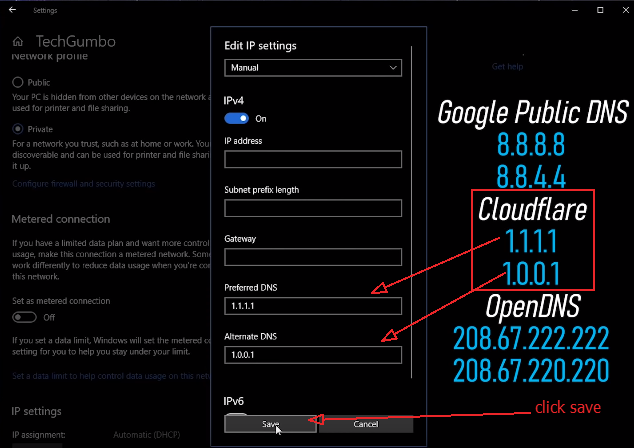
I'll enter one dot one dot one dot one and for alternate DNS I'll enter one dot zero dot 0 dot 1 and when you're done click on the Save button.After which you'll need to restart your computer for the new DNS settings to take effect. Will now change the DNS using the control panel.Let's go to the search box on older operating systems you may have to click the windows icon for search to appear. When you find it do a search for control panel and open it so we're on the same page in the upper right switch to the large icons layout then select network and sharing center in the left pane select change adapter settings right click on the one listed here that is connected to the Internet and select properties find Internet Protocol version 4 tcp/ip v4 make sure it's checked and selected click on properties select use the following
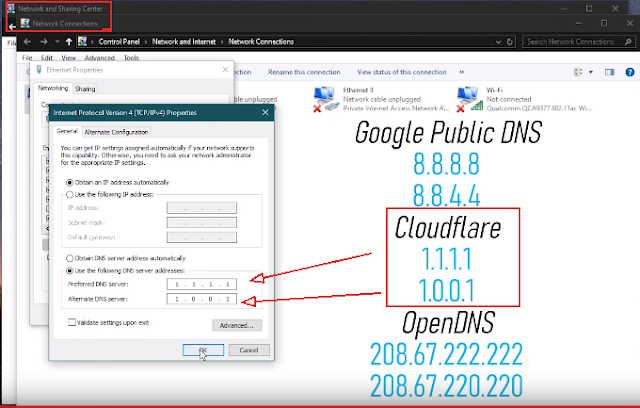

I'll enter one dot one dot one dot one and for alternate DNS I'll enter one dot zero dot 0 dot 1 and when you're done click on the Save button.After which you'll need to restart your computer for the new DNS settings to take effect. Will now change the DNS using the control panel.Let's go to the search box on older operating systems you may have to click the windows icon for search to appear. When you find it do a search for control panel and open it so we're on the same page in the upper right switch to the large icons layout then select network and sharing center in the left pane select change adapter settings right click on the one listed here that is connected to the Internet and select properties find Internet Protocol version 4 tcp/ip v4 make sure it's checked and selected click on properties select use the following

DNS server addresses and as we did earlier in the Settings app entering your preferred and alternate DNS addresses I won't be changing any of these when you're done click OK to save your settings.
)
0 Comments
please do not enter any spam link in the comment box.